
Bed Level Test Print
Knowledge Base Article | December 14, 2024
Introduction
The correct bed level is crucial for a successful 3D printed part. Incorrect bed leveling can result in part quality issues and or even part failure. The following procedure verifies that the bed is leveled properly.
Note: This test print should be performed after the shim bed level/laser bed level. Additionally, the procedure for this test print is the same for both desktop and industrial printers.
Evaluating the Test Print
Upon completion of the test print, you will find several disks that need evaluation. Compare your test print disks with the examples provided to determine the level of your bed.
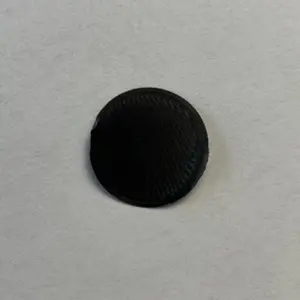
Well-Leveled
Uniform and solid disks indicate a well-leveled bed.
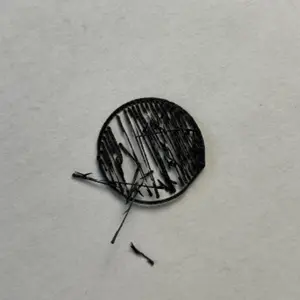
Bed Low
If the material is stringy or does not connect fully to the outer circle, it suggests the bed is low.
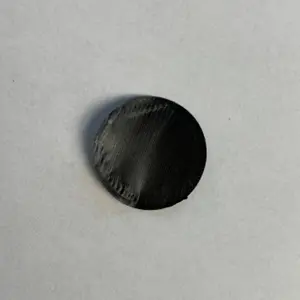
Bed High
Flattened or overly pressed disks are a sign of a high bed. Once peeled from the bed it will be thin and sheer.
Running the Bed Level Test Print Utility
1
Preparing Your Printer
Before beginning, it is important to ensure that your printer is updated to the latest firmware (2020-07-17 release or later). If your test print features a center disk, it is recommended to ignore it, as it is not a reliable indicator of bed level.
2
Safety First
As you work on the printer, remember that the print head will become hot. Exercise caution to avoid any potential accidents.
3
Clean & Prep the Print Bed
Start by thoroughly cleaning your print bed. Then, apply glue to the bed's surface as indicated in the accompanying picture. Once done, install the print bed back into the printer.
4
Accessing the Utility
Navigate through your printer's dashboard and select the Utilities tile. From there, choose the Test Prints tile, and finally, select the Bed Level Test Print tile.
Evaluating the Test Print
Understanding the Results
Upon completion of the test print, you will find several disks that need evaluation. Compare your test print disks with the examples provided to determine the level of your bed. Here are the key indicators:
- Well-Leveled: Uniform and solid disks indicate a well-leveled bed.
- Bed Low: If the material is stringy or does not connect fully to the outer circle, it suggests the bed is low.
- Bed High: Flattened or overly pressed disks are a sign of a high bed.
- Bed Very High: Disks that are inconsistently or not entirely laid down indicate a very high bed.
Adjusting the Print Bed
1. Cleaning & Re-Running Tests
After assessing your test prints, remove them using a scraper. Clean off any residual glue with warm water and reapply glue.
2. Making Adjustments
Should your test indicate a high or low nozzle, run the Shim Bed Level or Laser Bed Level (Industrial only) utility again. Follow the steps to adjust your print bed without loosening the thumbscrews*. Base your adjustments on the results from the Bed Level Test Print utility. After making your adjustments, re-run the Bed Level Test Print utility and ensure the bed is level.
*The Shim or Laser Bed level will ask you to lower the bed all the way using the thumbscrews. This step is not necessary for making smaller adjustments. Make adjustments to the print bed from the position it is already in.
Note: The test print procedure is similar for Nylon White and Onyx materials. If using legacy Tough Nylon material, clear or transparent results indicate a well-leveled bed, while white or uneven prints suggest the need for leveling.
