
Under-Extrusion Troubleshooting Markforged Industrial & Desktop 3D Printers
Knowledge Base Article | June 6, 2024
Introduction
If you are experiencing under-extrusion issues on a Markforged Industrial or Desktop series printer (e.g., X7, Mark Two, Markforged FX10), please refer to this troubleshooting guide.
Note: The plastic extruder and printhead are factory-calibrated. Do not adjust or disassemble unless instructed by Markforged Support or Partner. Warranty claims will not be honored for assemblies that have been adjusted, disassembled, or modified.
What is Under-Extrusion?
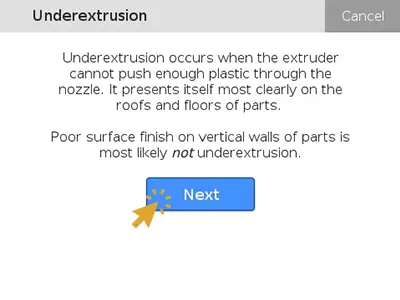
Under-extrusion occurs when there is resistance in the plastic material feeding system which limits the rate at which the plastic flows through the nozzle. This leads to visible gaps or stringing on the roofs of the printed parts. Additionally, under-extrusion can be diagnosed by a clicking noise on the left side of the printer, indicating that the plastic extruder cannot overcome the resistance in the material feeding system.
Note: Defects on vertical walls are typically not a result of under-extrusion. If you are experiencing defects on the vertical walls of your part, please contact your Markforged Partner.
Source of Resistance Leading to Under-Extrusion
- Loosely wound plastic filament tangling around the spool
- Plastic filament exiting from the bottom of the spool resulting in friction at the dry box adapter
- Desiccant packs rubbing against the spool
- Twists or bends in the plastic load tube, causing excess friction with the plastic filament
- Worn-out plastic tubes
- Worn-out dry box adapter
Note: If you have a Brass dry box adapter and are experiencing under-extrusion issues while printing Onyx, replace your adapter with the newer A2 Tool Steel adapter, which is more wear-resistant. If you have an active Markforged Success Plan or Digital Forge Complete Plan, contact your Partner for a replacement.
Running the Under-Extrusion Troubleshooting Utility
In this utility, you will examine or replace components in the four areas of the plastic material feeding system. After each prompt, the printer will perform an extrusion check to determine if the troubleshooting actions have improved the printer’s extrusion.
Start the Utility
1. Clear the print bed of prints and debris.
2. Wash the print bed and let it dry. Apply an inch-wide layer of glue where the purge line will be printed.
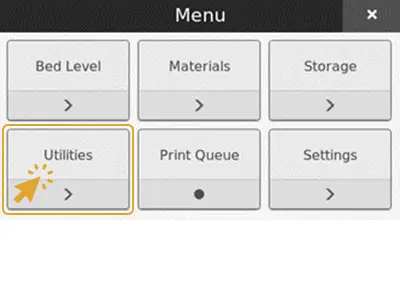
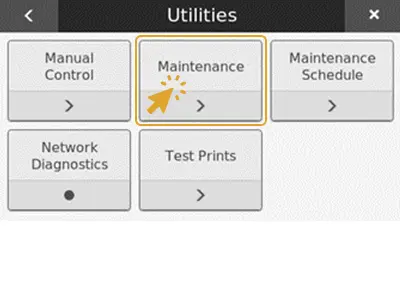
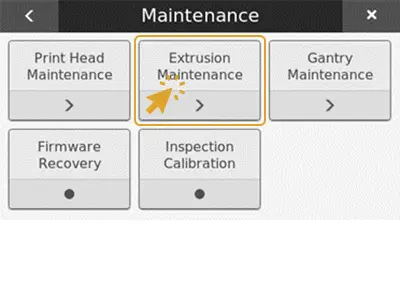
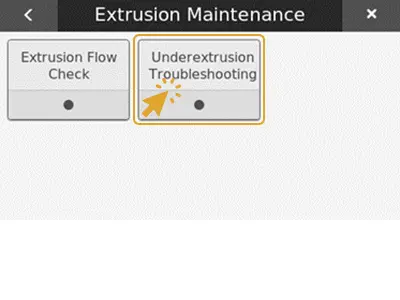
3. Navigate to the utility: Menu > Utilities > Maintenance > Extrusion Maintenance > Underextrusion Troubleshooting
4. Press Start to begin.

5. If the description applies to your part, press next.
6. Confirm that the part shows signs of under-extrusion. If it does, press Yes.

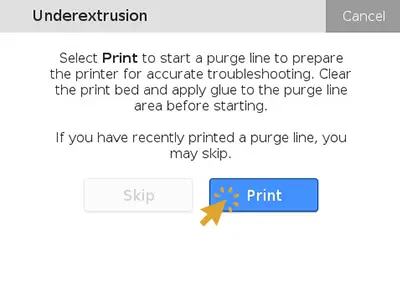
7. Print Wet Plastic Purge Line:
Print a purge line to make sure there is no wet plastic affecting the results of the under-extrusion test. You may skip the purge line if the utility allows.
Note: The Skip button will not be available if the printer has been idle for long enough to potentially have wet material around the extruder.
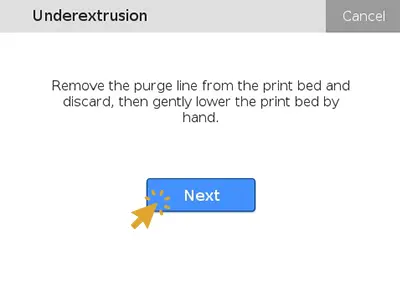
8. After the purge line is printed, clear it off the print bed. Then push the print bed down to its lowest position.
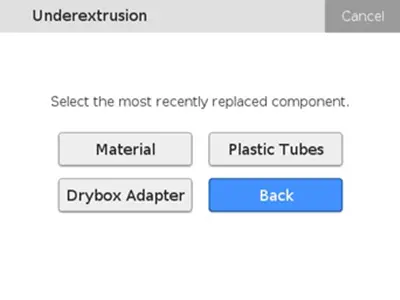
9. Press Next if you are troubleshooting a new under-extrusion issue. Press Skip Ahead if you have been instructed to jump ahead.
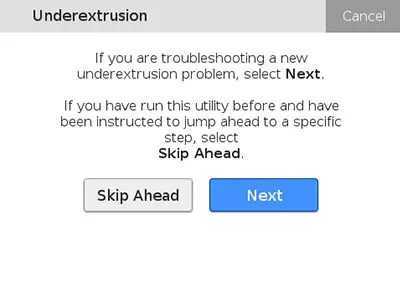
Note: Only select Skip Ahead if instructed to do so in a later step. This function allows you to exit the utility if you do not have the consumable parts on hand and resume the utility at the point it was exited.
If you are using the Skip Ahead function, replace the consumable part before resuming the utility. Once the part has been replaced, restart the utility and then select the component you replaced from the Skip Ahead screen.
Extrusion Checks
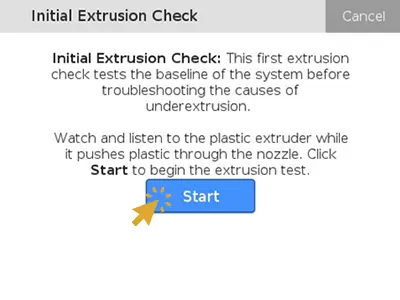
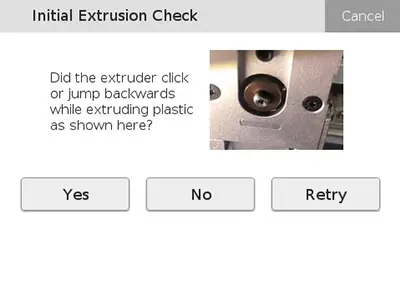
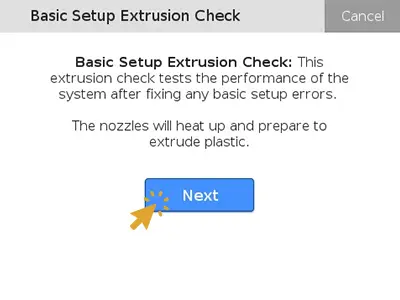
The utility will now perform an initial extrusion check. This will help you evaluate whether the under-extrusion issue can be addressed with this utility.
1. To perform the initial extrusion check, press Start. Watch and listen to the plastic extruder while the plastic is being pushed to the nozzle.
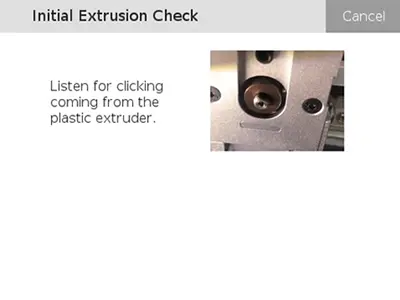
2. If the extruder clicks or jumps backward while extruding, click Yes. Otherwise, click No. If you would like the extruder to run again, press Retry.
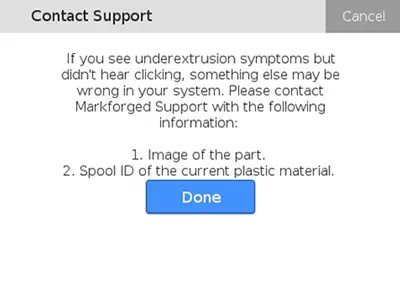
If you selected No (the extruder does not click or jump backward) but are experiencing signs of under-extrusion, please contact your Markforged Partner for support.
If you selected Yes, continue to the next section.
An extrusion check will be performed after each section of this utility and will be the same steps as the initial extrusion check. You will then evaluate whether the extruder has improved by seeing if the clicking has slowed or stopped. If the clicking persists, select Yes to continue troubleshooting; if the extruder clicking stopped select No to exit the utility.
If the clicking noise stops after changing a component, it usually indicates that the source of the resistance has been eliminated. If the clicking decreases but has not stopped, continue with the troubleshooting process to identify any other causes of under-extrusion. If the clicking has stopped but you are still experiencing under-extrusion in your printed parts, contact your Markforged partner.
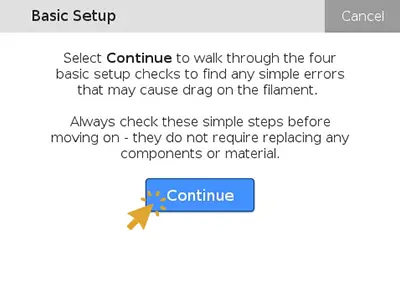
Check for Basic Setup Errors
It is good practice to perform these basic setup checks every time you suspect an under-extrusion issue. While printing and unspooling, the way the material feeds from the dry box to the extruder can change and new errors may occur.
1. Select Continue.
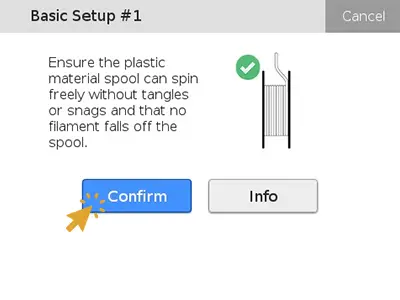
2. Open the dry box and check for tangled or unspooling plastic material. Re-spool any material that was tangled. Then press, Confirm.
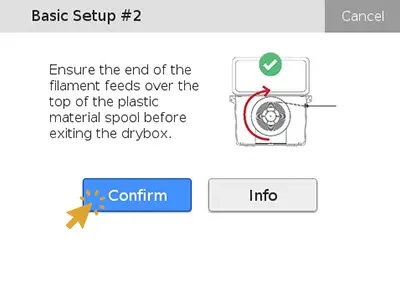
3. Verify that the plastic material feeds over the top of the spool. If the spool is feeding from the bottom, remove the material and spindle and flip it over in the dry box. Then press, Confirm.
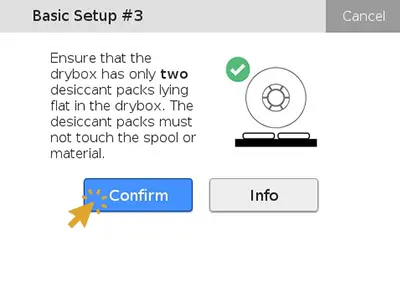
4. Check that there are only two desiccant packs and that they are placed where they will not interfere with the spool. Then press, Confirm.
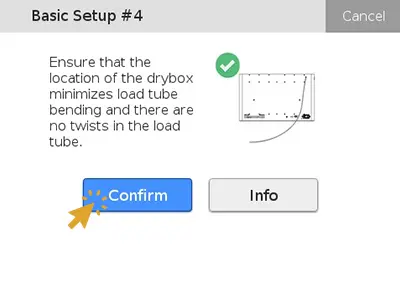
5. Check for any twists or bends in the plastic feed tube. Then press, Confirm.
Make sure the dry box is located somewhere that allows for an easy path between the dry box and the printer. This will prevent any force on the plastic feed tube that may cause twists or bends.
If the feed tube still appears bent, reload the plastic to make sure the filament itself is not twisted (Menu > Materials > Unload Plastic, then select Load Plastic at the end of the utility).
6. Once the basic setup errors have been checked, ensure the dry box is closed and fully latched. Improperly closing the dry box can result in wet material that will cause part quality issues. Then press, Confirm.

7. Press Next to perform an extrusion check. If the extruder still clicks or jumps backward while extruding, continue with the troubleshooting process.
Replace Plastic Material
Next, the utility will have you replace the plastic material. Follow the same steps as the Unload and Load Plastic utilities in this section.

Note: You will only be allowed to reload the same type of material as was previously loaded. If you do not have another spool of the same material, exit the utility and order another spool. Once you have received it, load your new spool of plastic and restart this utility. Select Skip Ahead when prompted and select Material to continue the troubleshooting process. If you need help purchasing material, please contact Saratech Additive Manufacturing.
Before discarding the unloaded material, record the spool ID that can be found on the barcode sticker on the spool (starting with EX0 or X0). If the material was the cause of the under-extrusion, please report the spool ID to your Markforged Partner.
If replacing the material did not mitigate the clicking, continue to the next section.
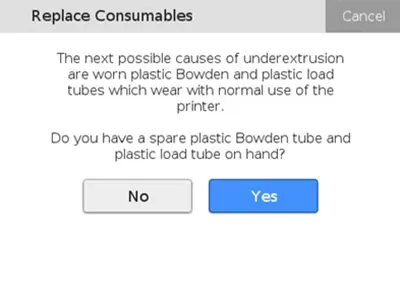
Replace Worn Plastic Tubes
Next, the utility will have you replace the plastic Bowden Tube.
Note: The plastic Bowden tube should be replaced every 3200 CCs of printing. However, some printing conditions can accelerate this wear. Additionally, the plastic load tube should be replaced around the same time as the Bowden tube. If you have an active Markforged Success Plan or Digital Forge Subscription, replacement plastic Bowden tubes are covered as wear and tear items. To receive replacement parts, contact your Markforged Partner. If you do not have an active Markforged Success Plan or Digital Forge Subscription, you can purchase replacement items by contacting the Saratech Additive Manufacturing Team.
1. If you have a plastic Bowden tube on hand, select Yes and continue. If you do not have one on hand, select No.
If you select No, select Exit Utility in the next prompt. Replace the plastic Bowden tube once you receive your replacement. Then restart this utility, select Skip Ahead when prompted, and select Plastic Tubes to continue the troubleshooting process.
2. Select Retract to retract the plastic material out of the printhead and plastic Bowden tube.
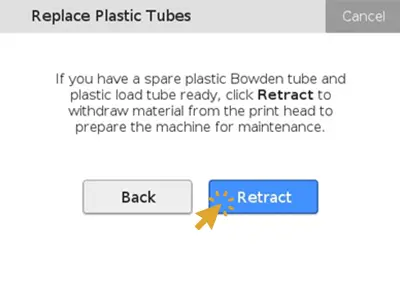
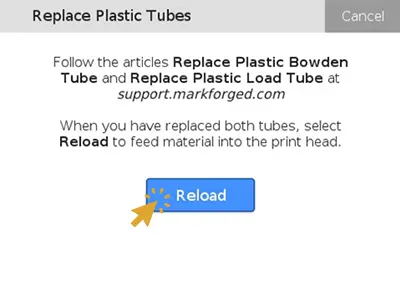
3. Replace the plastic Bowden tube by following the instructions here: Industrial or Desktop.
4. Also replace the plastic load tube. Open the dry box and re-spool the plastic filament that is in the load tube. Secure the end of the filament to the spool and close the dry box. Press the push-to-connect fittings on the outside of the dry box and the plastic extruder to detach the tube. Insert the new plastic load tube. Once the new load tube is in place, feed the plastic filament through the plastic load tube until it is at the extruder.
Note: After replacing the plastic Bowden tube and plastic load tube, be sure to reset the counters on your printer: Menu > Utilities > Maintenance > Maintenance Schedule. By resetting the counters, the printer will be able to notify you when it is time for the next replacement.
5. Select Reload to load the material back to the print head.
If replacing the plastic Bowden tube and plastic load tube did not mitigate the clicking, continue to the next section.
Replace the Dry Box Adapter
Next, the utility will have you replace the Brass dry box adapter with an A2 Steel one.
Note: If you have an active Markforged Success Plan or Digital Forge Complete Plan, contact your Partner for a replacement. You can also purchase the A2 tool steel dry box adapter by contacting the Saratech Additive Manufacturing Team.

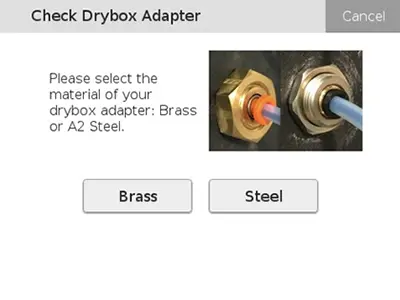
1. Check your dry box adapter and select which kind you have installed.
If you already have the A2 Steel dry box adapter installed, please contact your Markforged Partner to open a support ticket and provide the following information.
2. If you have the Brass dry box adapter installed, replace it with an A2 steel one. If you have an A2 steel dry box adapter on hand, select Yes. If you do not have one on hand, select No.
If you select No, select Exit Utility in the next prompt. Replace the dry box adapter once you have received it. Then restart this utility, select Skip Ahead when prompted, and select Drybox Adapter to continue the troubleshooting process.

3. Select Retract to retract the plastic material out of the printhead and plastic Bowden tube. Then open the dry box and re-spool the plastic filament in the plastic load tube.

4. Follow the instructions here: Industrial or Desktop, to replace the dry box adapter.
5. Once the dry box adapter is replaced, feed the material through the plastic feed tube until it has reached the extruder. Then select Reload to load the material to the printhead.

If replacing the dry box adapter did not mitigate the clicking in the extruder, contact your Markforged Partner to open a support case.
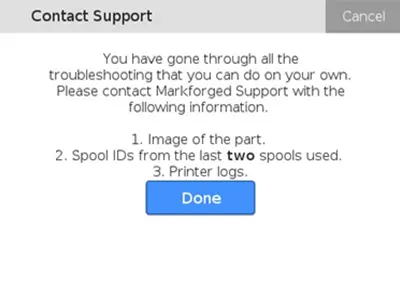
Contact Your Partner
If you have completed the Underextrusion Troubleshooting utility and still see signs of under-extrusion, or if you have been instructed within the utility to contact your Partner, follow the instructions below to help resolve the issue.
- Open a case with your Markforged Partner and provide the device ID.
- Attach images of your part(s) that are showing signs of under-extrusion. Take images from multiple angles, if possible.
- Supply the material spool ID that was used when printing the part showing signs of under-extrusion.
- Attach the printer logs. Print logs can be retrieved from Eiger or the printer via USB.
