

How to Rename a Part in Solid Edge
Blog Article | September 17, 2026
Summary
This guide explains how to safely rename a part in Solid Edge using Design Manager. Because Solid Edge part files may be referenced by assemblies, drawings, subassemblies, and other documents, renaming a .par file directly in Windows File Explorer can lead to broken links or missing references. The recommended workflow is to open the higher-level assembly, launch Design Manager from the Data Management tab, locate the part, stage the Rename action, enter the new filename, review affected references with tools such as Where Used, and select Perform Actions to complete the change. The article also explains the difference between renaming and revising a part, the importance of standardized naming conventions, and considerations for shared, unmanaged, and PDM/PLM-managed CAD environments.
Key Topics Covered
- Use Solid Edge Design Manager to safely rename referenced part files.
- Avoid renaming referenced .par files directly in Windows File Explorer.
- Start from the higher-level assembly to maintain context for file relationships.
- Review Where Used information to identify assemblies and drawings that reference the part.
- Understand the difference between renaming a file and creating a new engineering revision.
- Follow consistent part-number and filename conventions to keep CAD data organized.
- Validate affected assemblies and drawings after completing the rename.
Understanding Part Renaming in Solid Edge
Renaming parts cleanly is essential for CAD file management, version control, and maintaining reliable assembly relationships. Whether you are updating a part number, correcting a temporary filename, aligning with company standards, or preparing a design for release, the way you rename a Solid Edge part matters.
Solid Edge part files are often referenced by assemblies, drawings, subassemblies, and related design documents. If a referenced .par file is renamed directly in Windows File Explorer, those related files may continue looking for the original filename. This can result in missing components, broken links, unresolved drawing views, and unnecessary cleanup work.
For referenced Solid Edge files, the recommended workflow is to use Design Manager. Design Manager allows you to rename documents while working in the context of the higher-level assembly and helps preserve the relationships between related files.
Why Rename a Part?
There are several common reasons an engineering team may need to rename a part in Solid Edge. While renaming may seem like a simple administrative task, it plays an important role in keeping CAD data organized and usable throughout the product lifecycle.
Versioning & Revision Control
As products move through concept, design, review, testing, and release, part names may need to change to reflect official part numbers, approved descriptions, or project naming standards. A concept model may begin with a temporary name, then later receive a formal part number once it becomes part of a released assembly. Renaming the file helps keep the CAD data aligned with the project structure and downstream documentation. However, it is important to distinguish between renaming and revising. Renaming changes the filename of the existing document. It does not, by itself, create a new engineering revision, approval record, or release history. If your goal is to create a new engineering revision, use the appropriate Revise workflow or your organization’s PDM/PLM process. If your goal is to correct or standardize the filename of an existing document, use the rename workflow in Design Manager.
Correcting Naming Conventions
During Early Design Work, Files Are Often Created Quickly With Temporary Names Such As:
- bracket1.par
- new_part.par
- test_mount.par
These names may be useful during concept development, but they can quickly become confusing as an assembly grows. Renaming a part allows the filename to better describe the component or match your internal naming standards.
A Clear Name Might Include:
- A part number
- A short description
- A project identifier
- A revision indicator, if required by your process
For example: 123456_mounting_plate.par is much easier to identify than plate_new.par. The specific format depends on your company’s standards, but consistency is the key. Clear filenames make it easier to search for files, identify components in assemblies, communicate with team members, and reduce the chance of using the wrong file.
Aligning With Project or BOM Standards
Many organizations require CAD filenames to align with part numbers, bill of materials entries, ERP records, customer documentation, or manufacturing standards.
If the CAD filename does not match the project or BOM standard, confusion can occur between engineering, manufacturing, purchasing, quality, and documentation teams.
Renaming a part in Solid Edge through the correct workflow helps keep the CAD structure aligned with downstream systems. This is especially useful when designs move from concept to production and temporary names need to be replaced with formal part numbers or approved descriptions.
How to Access the Rename Part Tool
When renaming a referenced part in Solid Edge, it is important to use the correct tool. For parts used in assemblies or drawings, the recommended tool is Design Manager. Design Manager is designed for file-management operations such as renaming, moving, copying, and revising Solid Edge documents while helping maintain links between related files.
Recommended: Data Management Tab → Design Manager
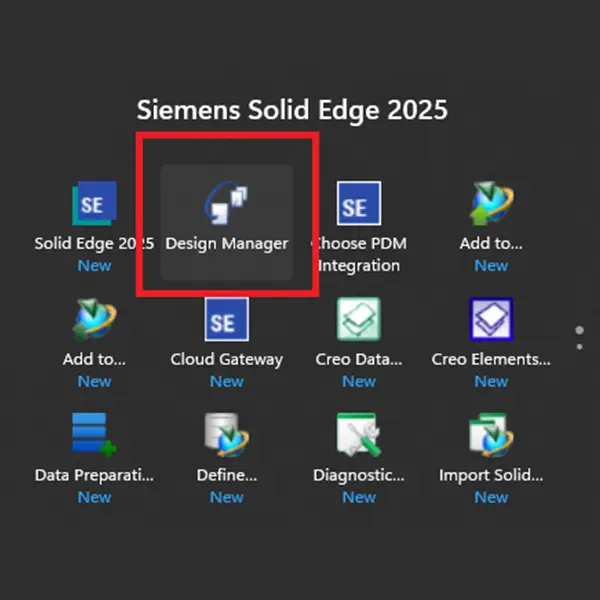
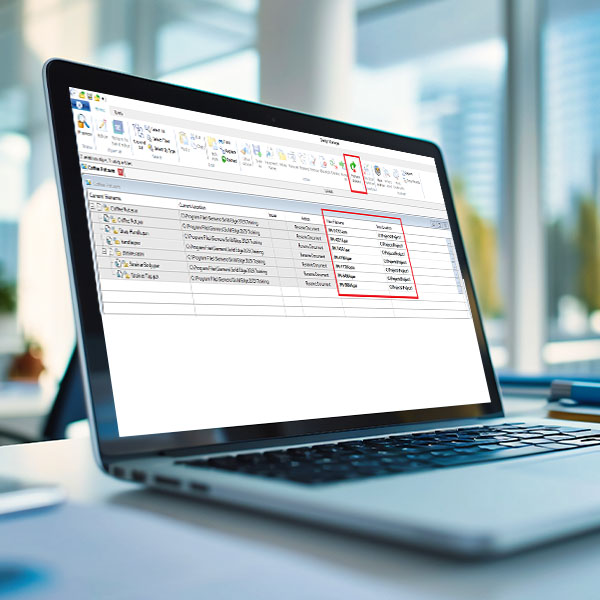
A common and accurate workflow is to start from the assembly that contains the part you want to rename. Open the higher-level assembly in Solid Edge, then go to the Data Management tab and select Design Manager. You don’t have to go through Solid Edge, you can also open through the Design Manager application. When Design Manager opens, it displays the assembly structure in a file-management view. From there, you can review the current filename, current location, action, new filename, and new location before committing the change. This is the preferred workflow because it allows you to rename the part in the context of the assembly that references it.
Ribbon: Home tab → Action group → Revise
The original outline referenced a ribbon path such as Home tab → Move/Copy → Rename. This should not be presented as the primary workflow for safely renaming a referenced part file in an assembly context.
For this article, the more accurate guidance is to use Design Manager instead. Design Manager gives you the file relationship context needed to rename a part while helping preserve assembly and drawing references.
Step-By-Step: Renaming a Part
The safest approach is to rename the part through Design Manager rather than changing the filename directly in Windows File Explorer.
Step 1
Open the Part or Assembly Containing the Part
Start by opening the higher-level assembly that contains the part you want to rename. This is preferred over opening only the individual .par file because the assembly provides context. It allows you to see where the component is used and helps Design Manager display the related document structure. If the part is used in multiple assemblies or drawings, take a moment to understand where the file is referenced before changing the name.
Step 2
Launch Rename Part Command
From the open assembly, go to the Data Management tab and select Design Manager. Design Manager opens the assembly in a file-management view. The structure displays referenced parts, subassemblies, and related documents included in the assembly. In Design Manager, locate the part you want to rename and select the Rename action. At this stage, Design Manager is staging the operation. It does not immediately change the file on disk. This staged workflow gives you the opportunity to review the action before committing it.
Step 3
Enter New Part Name & File Path
In the New Filename field, enter the approved part name while retaining the correct Solid Edge file extension.
For example, bracket1.par might become 123456_mounting_bracket.par.
Use your organization’s naming convention whenever possible. A good filename may include a part number, short description, project identifier, or other approved naming element. Also confirm the file path. If the part should remain in the same folder, make sure the location has not changed. Renaming and moving are different operations, so avoid changing the path unless moving the file is intentional.
Step 4
Confirm Reference Updates
Before committing the rename, review the affected documents in Design Manager. Check columns such as:
- Current Filename
- Current Location
- Action
- New Filename
- New Location
- Referenced or parent documents
Use Where Used when appropriate to identify other documents that reference the part. This may include drawings, subassemblies, or other assemblies outside the structure currently displayed. Where Used is especially helpful when you need to find references to the old name and determine which documents may need to be updated to use the new name.
In an unmanaged Solid Edge environment, this can take time. Files may be spread across multiple folders, shared drives, or project directories. Where Used results can also depend on the configured search locations, indexing, and data-management environment, so files outside those locations may not appear.
If your organization uses Solid Edge data management or a PDM/PLM system, this process is typically faster and more reliable because the system can track relationships, ownership, revisions, and where-used information more effectively. As a best practice, major rename operations perform much better within a proper PDM or managed data environment.
Step 5
Save & Rebuild Assemblies
Once the proposed changes are correct, select Perform Actions in Design Manager. This is the point at which Design Manager executes the staged rename operation. Until Perform Actions is selected, the rename has not been fully committed. After the rename is complete, return to Solid Edge and open the affected assembly. Check that:
- The renamed part resolves correctly
- No missing-file warnings appear
- Assembly relationships remain intact
- The correct component appears in the assembly
- Any related drawings update correctly
If drawings reference the renamed part, open those drawings and confirm that views update as expected.
Save and rebuild affected assemblies as required by your normal workflow.
Build Solid Edge Skills to Reduce Rework & Improve Efficiency
Tips for Smooth Renaming
Renaming parts is easier and safer when your team follows consistent file-management practices. Clear naming conventions, reliable reference management, and standardized workflows can help reduce broken links, avoid confusion, and keep Solid Edge assemblies and drawings organized as designs evolve.
Use Standardized Naming Conventions
A standardized naming convention keeps CAD data easier to understand and manage.
Whenever Possible, Define a Naming Format That Includes Useful Information Such As:
- Part number
- Description
- Project code
- Revision indicator, if required by your process
For example, your organization might use a format like PartNumber_Description or PartNumber_Description_Revision. The exact format depends on your company’s requirements, but the key is consistency.
Avoid vague names, duplicate names, and temporary labels that are never updated. Clear filenames make it easier for engineering, manufacturing, purchasing, quality, and documentation teams to work from the same information.

Work in a Team Environment With Checked-In Files
If you are working in a shared environment, make sure files are properly checked in, checked out, or locked according to your company’s process. Renaming a file while another user has it open or referenced can create conflicts.
Before Renaming a Shared Component, Confirm That:
- No one else is actively editing the file
- The file is not open in another session
- Related assemblies and drawings can be updated
- The team understands the rename is happening
In a managed data environment or PDM/PLM system, checkout controls help prevent multiple users from making conflicting changes at the same time. If your organization uses Teamcenter, Solid Edge data management, or another PDM system, follow the approved rename and revision workflow defined by that system.
Back Up Before Major Renaming Operations
For a single part, renaming may be straightforward. But if you are renaming many files, restructuring folders, or updating a large assembly, create a backup or controlled copy of the dataset before making changes.
Before a Major Renaming Effort, Consider Documenting:
- Which files are being renamed
- Old filenames
- New filenames
- Where the files are used
- Which assemblies and drawings need validation
- Who is responsible for checking the results
This documentation provides a recovery point and makes troubleshooting easier if something does not update as expected.
Design Manager lets you stage operations before committing them, but a backup provides an additional safeguard when working with large or complex datasets.
Conclusion
Learning how to rename a part in Solid Edge is an important skill for keeping CAD data organized and reliable. A clean renaming process helps maintain naming standards, align files with BOM and project requirements, and protect assembly and drawing relationships.
For referenced Solid Edge parts, avoid renaming the file directly in Windows File Explorer. Instead, use Design Manager from the context of the higher-level assembly. Locate the part, stage the Rename action, enter the new filename, use Where Used when needed to understand additional references, review the proposed changes, and then select Perform Actions.
For unmanaged Solid Edge data, reference updates can take extra time and care. For teams working with large assemblies, shared datasets, or frequent file changes, a managed data environment or PDM system can make renaming faster, safer, and more reliable.
Mastering the rename workflow in Solid Edge helps ensure your filenames stay organized, references remain intact, and assembly integrity is preserved throughout design updates.
Key Takeaways
- Use Solid Edge Design Manager to rename referenced part files while helping preserve links to assemblies and drawings.
- Avoid renaming referenced .par files directly in Windows File Explorer, which can lead to broken or missing references.
- Start from the higher-level assembly so Solid Edge can better identify the part’s relationships and dependencies.
- Use Where Used to review which assemblies, subassemblies, and drawings reference the part before making changes.
- Understand that renaming a part is not the same as creating a new revision in an engineering change process.
- Follow consistent CAD naming conventions so filenames, part numbers, and project identifiers remain organized and searchable.
- After renaming, validate affected assemblies and drawings to confirm the renamed part resolves and updates correctly.
