
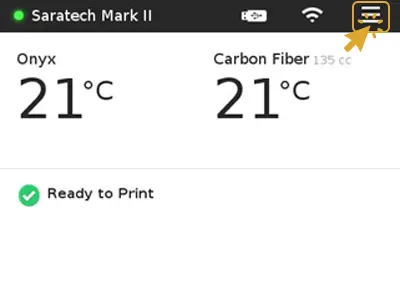
The Ultimate Bed Leveling Guide for Markforged Industrial & Desktop 3D Printers
Knowledge Base Article | January 10, 2024
Introduction
The correct bed level is crucial for a successful 3D printed part on your Markforged 3D printer. Incorrect bed leveling can result in part quality issues and or even part failure. The following procedure levels and verifies that the print bed is leveled properly.
Before bed leveling, clean the print bed with water to remove any glue residue and dry with a paper towel. Additionally, ensure that the nozzles are clean; remove any plastic on or extruded from the nozzle as this may result in improper leveling.
Supplies
• Scraper
• Glue Stick
• Leveling Shims (plastic and fiber)
• 2.5mm hex key

Leveling Shims (plastic and fiber)
Shim Bed Leveling
In the Shim Bed Level procedure, you will use the Plastic and Fiber Leveling shims provided by Markforged with your printer to level the print bed. This utility can be performed on both Desktop and Industrial Markforged printers.
Note: If you are switching between print beds, you may need to run the Adjust Z Offset utility to level the bed.
CAUTION: The print head will move autonomously during this utility.
Run Shim Bed Level Utility
1. Select menu > Bed Level > Shim Bed Level


2. Read the warning on the screen and press Next.

3. Grab the two leveling shims from your accessory kit, then press Next.

4. Loosen the three thumbscrews below the print stage to its lowest point and press Next
Caution: Do not over-loosen the thumbscrews, this may cause the springs and thumbscrews to fall out of the print stage. Loosen the thumbscrews to the point where the print bed does not lower any further.

5. Slide the plastic shim between the print bed and the plastic nozzle and press Next.

6. Adjust the thumbscrew to raise the print bed until you feel slight resistance on the shim and press Next
Note: If this is your first time performing this utility, you may need to repeat this process a few times to develop a sense for the right amount of resistance. Additionally, if the bed is in its highest position and there is still no resistance on the shim, run the Adjust Z Offset utility and return to the Shim Bed Leveling utility.

7. Repeat steps 5 and 6 for each thumbscrew as the utility prompts.
8. The utility will then have you verify the shim resistance over the rightmost thumbscrew. If there is no longer a slight resistance on the shim, this means the bed is not level so adjust the thumbscrew until you feel a slight resistance on the shim and press Retry to readjust the other two thumbscrews. Otherwise, press Next.

9. Slide the fiber shim between the fiber nozzle and the print bed and press Next.

10. Use the 2.5mm hex key to adjust the fiber nozzle height until you feel a slight resistance on the fiber shim. (Turn clockwise to lower the nozzle, counterclockwise to raise the nozzle)


11. Check the resistance between both shims again and press Run Test Print to verify that the bed is leveled properly. Press Retry to go through the Shim Bed Leveling utility again.

Need Additional Assistance With Markforged 3D Printing? Saratech 3D Printing Experts Can Help.
Connect With a Saratech 3D Printing Expert Today.
Laser Bed Leveling
In the Laser Bed Leveling procedure, the lasers on the printer will be used to level the print bed. The lasers provide live feedback during this utility and ensure that the bed is accurately leveled. This utility is only available for Industrial printers (e.g., Markforged X7, Markforged FX10) and acts as an alternative to the Shim Bed Level utility. The Plastic and Fiber Leveling shims are also needed for this utility.
CAUTION: The print head will move autonomously during this utility.
Run the Laser Bed Level Utility
1. Select Menu > Bed Level > Laser Bed Level


2. Read the warning on the screen and then press Start.

3. The print head will perform an initial scan of the print bed, once completed press Next.
Note: If the bed is too high or too low, which may happen when switching between beds, the printer may display an error. In this it will ask you to restart the laser leveling process with the thumbscrews loosened all the way. You may also need to run the Adjust Z Offset utility.

4. Adjust the thumbscrew so that the arrow is within the green region of the Laser Reading bar on the screen. Then press Next.


5. Repeat step 4 for the other two thumbscrews as prompted by the utility.
6. The print head will perform another scan of the print bed, once completed press Next to calibrate the relative positions of the nozzle.

7. Grab the two leveling shims from the accessories kit and press Next.

8. Slide the plastic shim under the plastic nozzle and adjust the print bed in small increments using the Nudge Up and Nudge Down buttons on the screen. Adjust the print bed until you feel a slight resistance on the shim and then press Next.
Note: Ensure the nozzle is clean and there is no plastic on or extruding from the nozzle. Clean the nozzle using a tweezer or brass brush from your accessories kit.

9. Slide the fiber shim under the fiber nozzle and press Next.
10. Use the 2.5mm hex key to adjust the fiber nozzle until you feel a slight resistance on the fiber shim. Then press Next.
11. Press Next to calibrate the fiber nozzle height if needed or press Skip to exit the utility.
Note: The Adjust Fiber Nozzle Height utility must be performed if the fiber nozzle was adjusted or replaced.
Bed Level Test Print
The Bed Level test print will verify that the print bed is properly leveled. This procedure must be performed after the Shim Bed Level every time. Additionally, it is recommended but optional after the Laser Bed Level.
Run the Bed Level Test Print Utility
Note: Before beginning, it is important to ensure that your printer is updated to the latest firmware (2020-07-17 release or later). If your test print features a center disk, it is recommended to ignore it, as it is not a reliable indicator of bed level.
CAUTION: As you work on the printer, remember that the print head will become hot. Exercise caution to avoid any potential accidents.
1. Clean your print bed and apply a thin even layer of glue to the bed. Then, reinstall the print bed.
2. Select Menu > Bed Level > Laser Bed Level


Evaluating the Test Print
Upon completion of the test print, you will find several disks that need evaluation. Compare your test print disks with the examples provided to determine the level of your bed.
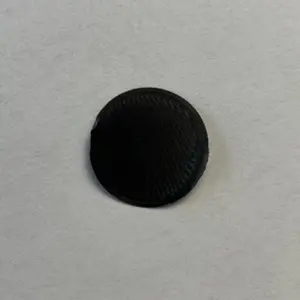
Well-Leveled
Uniform and solid disks indicate a well-leveled bed.
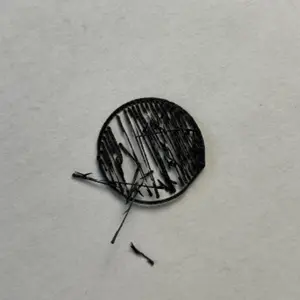
Bed Low
If the material is stringy or does not connect fully to the outer circle, it suggests the bed is low.
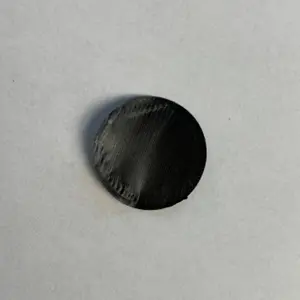
Bed High
Flattened or overly pressed disks are a sign of a high bed. Once peeled from the bed it will be thin and sheer.
1. After assessing your test prints, remove them using a scraper. Clean off any residual glue with warm water and reapply the glue.
2. Adjust your print bed according to the assessment from your test print. Should your test indicate a high or low nozzle, run the Shim Bed Level or Laser Bed Level (Industrial only) utility again. Follow the steps to adjust your print bed without loosening the thumbscrews*. Base your adjustments on the results from the Bed Level Test Print utility. After making your adjustments, re-run the Bed Level Test Print utility and ensure the bed is level.
*The Shim Bed level will ask you to lower the bed all the way using the thumbscrews. This step is not necessary for making smaller adjustments. Make adjustments to the print bed from the position it is already in.
Note: The test print procedure is similar for Nylon White and Onyx materials. If using legacy Tough Nylon material, clear or transparent results indicate a well-leveled bed, while white or uneven prints suggest the need for leveling.
Adjust Fiber Nozzle Height
The Adjust Fiber Nozzle Height utility is run to fine-tune the fiber nozzle height. This is crucial when printing with continuous fibers to ensure the fibers are laid down correctly into the part. If the fiber nozzle height is set incorrectly, it can cause stringing or groove marks on your parts and jams in your fiber nozzle. This utility is available on both Desktop and Industrial printers.
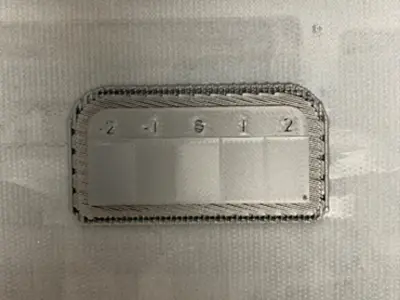
In this utility, a Fiber Nozzle Calibration Test Print is performed to measure the height difference between the plastic and fiber nozzle. A staircase is printed, as shown below, and used to set the correct height of the fiber nozzle. The steps on the staircase increase in height from left to right and are indicated by numbers to use when adjusting the nozzle. After the staircase is printed, the fiber nozzle will be dragged at a constant height over the steps and leave marks on the steps that it hits. A correctly calibrated fiber nozzle will leave marks on Steps 0, 1, and 2. The fiber nozzle will swipe across the steps three times and will pause between each swipe to allow adjustment of the fiber nozzle.
Run the Fiber Nozzle Calibration Test Print
1. Before starting this test print, ensure that the print bed is level.
2. Clean the print bed, apply a thin even layer of glue, and install the print bed.
3. Select Menu > Bed Level > Adjust Fiber Nozzle Height

4. Select Print Staircase.

5. Once the staircase is printed and the fiber nozzle is heated, press Next for the first swipe across the staircase.

6. Examine the part, without removing it from the print bed, and identify the steps with a drag mark.
Note: Marks are difficult to see on the Nylon White; examine carefully before lowering the nozzle and rerunning the test print.
- If the mark begins in Step 0, the fiber nozzle is correctly calibrated.
- If the mark begins in Steps -2 or -1, the fiber nozzle is too low.
- If the mark begins in Steps 1 or 2, the fiber nozzle is too high.

7. After examining the part, use a 2.5mm hex key to adjust the fiber nozzle accordingly.
Note: rotating the adjustment screw 18 degrees clockwise or counterclockwise will lower or raise the fiber nozzle by a step, respectively.
8. Press Next to swipe the nozzle over the part again. Continue swiping and adjusting the fiber nozzle until it is at the correct height.

9. After the third swipe, press Done if the fiber nozzle is correctly calibrated. Press Retry to continue swiping the nozzle.*

*The nozzle will return to the first row and drag across again. If the bed was too high and only the positive numbered steps were marked, you may retry on those rows to see if Step 0 is marked and the fiber nozzle is correctly adjusted. If the bed was too low and the drag marks start from the negative steps, these rows will not be usable to swipe again. If there are no rows left to swipe on, please reprint the staircase and try again.
